
This pneumatic robotic arm workshop is design to introduce basic concepts of robotics and making to grade-school students. The design is based on ones used in middle school and high school robotic competitions. We have created a simplified version for one-time workshops with kids of all ages.
Please note, this material is provided for informational purposes only and is not a guide on how to create the designs. Please take a look at our disclaimer.
The two main science concepts are:
- Leverage: A lever is a simple machine consisting of a bar that pivots on a fixed point (fulcrum). Levers are used to amplify input force. The robotics arm requires placing the syringes in positions that exploit leverage. You can find out more here.
- Pneumatic:Pneumatic power uses compressed air as an energy source. Basic components of a pneumatic engine are: reservoir, pump, value and cylinder. In this workshop the syringe is the pneumatic engine. Pneumatic power is widely used in robotics and industry. Here is a link for other project ideas.
Required Supplies:
Each student will require:
- x4 syringes
- x2 4-inch piece of tubing
- 1 4×4 piece of wood
- x5 Popsicle sticks
- X2 nut and bolts
The photo below is the full-scale model used in high school competitions. It requires 2-3 students to control. One of the Hip Monster sisters built it at a Sacred Heart Robotics Camp in San Francisco, CA.
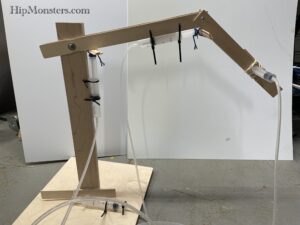
Here is a side view with the arm down.
The competition involves stacking blocks and the score is based on time it takes to move all the blocks and height of the stack. Controlling the arm is a true team effort with 2-3 students working together to move the arm. The winning design not only requires good engineering but perfect team work. Engineering competitions are ideal ways for kids to develop technical as well as social skills. Below is a video of the arm in action:
<video of it working>
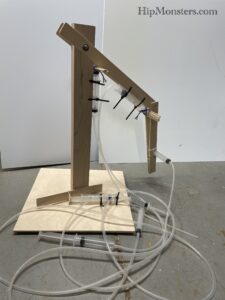
For our grade school work shop we choose a smaller and simpler design that only required one student to control the robotic arm. You can still have a team competition with two students per robot (one controlling each syringe) if desired.
Below are several views of our simplified design. Instead of zip ties we use rubber bands and tape.

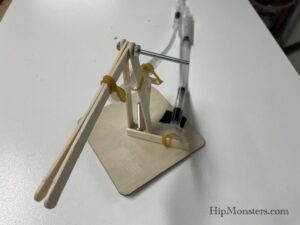
Here is a view from above. This design does not use hot glue and is suited for all ages.
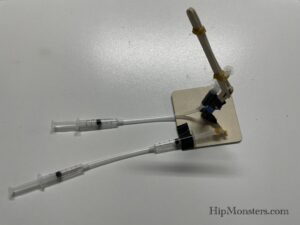
This is another design suited for more advanced students.

Here is a side view showing the placement of the syringe in the middle of the base to provide better range of movement.
In the video below one of the Hip Monster’s sister’s team does a quick build of an arm.

Here are the step by step instructions:
- Drill a hole in the center of the square plywood which will be the base for your robotic arm.
- Now push a bolt through the hole and secure it using a nut. The bolt will be the support for your arm.
- Drill a hole on one end of four popsicle sticks.
- Use the two popsicle sticks placed on either side of the bolt with the holes on the top.
- Secure using rubber bands making sure to let it pivot.
- Secure a syringe to a popsicle stick. This popsicle stick provides leverage helping move the arm.
- Use rubber bands instead of tape or glue. Rubber bands let the mechanism flex as the pump extends pushing the arm.
- Attach the piping and connect another syringe.
- Adjust the two syringes so when you depress one the other extends.
- Attach one end to the popsicle stick using a rubber band.
- Next secure the other end to the edge of the base using tape.
- Slow depress the syringe pump your arm will move!
- Now attach two popsicle sticks to the top of the arm.
- Secure with a bolt and nut.
- Secure the syringe pump to the forearm with rubber bands.
- Now attach the syringe base to the arm using tape.
- Connect the other syringe.
To improve performance you can turn your pneumatic robot to a hydraulic powered one by just adding water! You can get more information here.
